OAuth 2.0 Introduction
What is OAuth 2.0?
The OAuth 2.0 specification defines the industry-standard protocols for authorization. It simplifies client development while providing specific authorization flows for different types of applications. IETF OAuth Working Group is developing the specifications along with their extensions for desktop, mobile, and web applications.
Why OAuth?
The need for an authorization framework has risen from websites & web applications wanting to integrate with each other. Earlier web platforms were not talking with each other, but nowadays, nearly all the platforms request you to share some specific information from another platform. The OAuth framework is designed in this new world of consent and authorization to offer specific flows.
How does OAuth 2.0 work?
Suppose an application is requesting your connections from one of your social accounts. If you give your username and password for your account to the client application, it can also post on your wall or read some other data that it should not access. OAuth uses some workflows, roles, grant types, and use cases to address these problems.
There are four main roles in the OAuth specification:
- Client (Application)
- Resource Owner
- Resource Server
- Authorization Server
In the above case, the application requesting some resource from another platform is called Client Application, the platform that will share your information is the Resource Server. The server where you authorize yourself with the resource server is called Authorization Server. You will be the Resource Owner in this case.
In a typical scenario, a client application requests an Access Token from the authorization server where you will log in as resource owner with your credentials to give consent and with this access token client application requests your shared resource from the resource server. So, the client application never sees your password, and you can cancel the resource sharing anytime you want.
For the developers, both the resource server and authorization server roles can be seen as APIs that verify user identity and provide an access token to the application.
The authorization flows vital for web applications, desktop applications, and mobile devices are defined in the OAuth 2 specification.
Flows
Abstract Protocol Flow
 +--------+                               +---------------+
 |        |--(A)- Authorization Request ->|   Resource    |
 |        |                               |     Owner     |
 |        |<-(B)-- Authorization Grant ---|               |
 |        |                               +---------------+
 |        |
 |        |                               +---------------+
 |        |--(C)-- Authorization Grant -->| Authorization |
 | Client |                               |     Server    |
 |        |<-(D)----- Access Token -------|               |
 |        |                               +---------------+
 |        |
 |        |                               +---------------+
 |        |--(E)----- Access Token ------>|    Resource   |
 |        |                               |     Server    |
 |        |<-(F)--- Protected Resource ---|               |
 +--------+                               +---------------+
If you look at the above diagram from OAuth 2.0 Framework, the main steps are:
- The client directly requests authorization (A) from Resource Owner (as shown in the figure) or preferably via the Authorization Server
- The client receives an authorization grant (B) (see grant types) and requests an access token from the Authorization Server with this grant (C)
- The client receives access token (D) and requests the protected resource with the provided access token from the Resource Server (E)
- The client receives the protected resource from Resource Server (F)
OAuth 2.0 Grant Types
Based on the different grant types, the actual flow will differ. The specification defines four grant types besides the extensibility mechanism for defining additional types:
Authorization Code Grant
This grant type is mainly used for server-side applications. The authorization code is obtained by using an authorization server as an intermediary between the client and the resource owner. In this model, the client uses redirection mechanisms with the user-agent to send the resource owner to the authorization server. After that, the authorization server redirects the resource owner to the client application with the Authorization Code Grant. Then, the client can request an access token with this grant. In this model, the resource owner’s credentials are never shared with the client.
Implicit Grant
This grant type is the simplified version of the above grant type. This type is most suitable for mobile applications or clients running a scripting language like JavaScript etc. This type also uses a redirection-based mechanism but, the Authorization Server directly returns the access token. In this model, the client is not authenticated by the Authorization Server. This type of flow is more efficient as the number of server calls is minimized.
Resource Owner Password Credentials Grant
In this grant type, the client directly sends the resource owner’s credentials (e.g., username and password) to get an access token. In this case, there must be a certain level of trust between the resource owner and the client application.
Client Credentials Grant
This grant type is used when the client wants to access its protected resources or the protected resources previously arranged with the authorization server. In this case, the client and the resource owner are the same entity, and client credentials are used to get an access token.
OAuth 2.0 Tokens
Access Tokens
Access Tokens are the credentials (mostly String values) that enable us to access the protected resources. The tokens may have different formats and may contain some cryptographic properties which are understood by the resource server. The token can be used until it expires or is revoked.
Sometimes the token is a random sequence of alphanumeric characters that contains no special meaning. But, there is another popular token type which is called JSON web token (JWT). It is a compact and self-contained JSON object which enables us to transmit information between applications securely. The JWT token is encoded and sent as a POST parameter easily and quickly.
Refresh Tokens
Refresh tokens are the credentials that enable us to renew access tokens when they expire or are revoked. If the authorization server generates a refresh token when the client gets the access token then, this will be used to issue a new access token from the authorization server. The client sees Invalid Token Error as a response to a resource request and by presenting the refresh token, it takes a new access token.
Spring Security Introduction
As you may know, Spring Security is designed as a powerful security framework that enables customizable authentication and access control for applications. The framework provides easily extendable and highly customizable authentication and authorization facilities to Java applications. Spring Boot also provides lots of auto-configuration to simplify setting up OAuth2 clients, Authorization, and Resource Servers.
Spring OAuth2 Evolution
Spring Security has been providing Spring Security OAuth project to support OAuth and OAuth2 using standard Spring and Spring Security programming models and configurations. The project is now in a deprecated state and embedded in the new Spring Security 5 project. The project is significantly simplified as it is now targeting OAuth2 only. The project now supports implementing SSO, social login, resource server, and authorization server using Spring Security 5. The authorization server feature is still in an experimental state.
Sample Application
We will now connect the things together and build a sample application that OAuth2 secures. At first, we will set up an Authorization Server and then implement our service as the Resource Server, and finally, we will build a small rest service to access our resource by using OAuth2.
We can create a new Spring application from Spring Initializr by adding the Spring Web dependency.
To set up a resource server, we will need to complete some simple steps. One of them is adding the dependency, and the other is configuring the authorization server. Most of the resource server support feature is collected into the spring-security-oauth2-resource-server Maven dependency. We will add this dependency to our pom.xml.
<dependency>
    <groupId>org.springframework.boot</groupId>
    <artifactId>spring-boot-starter-oauth2-resource-server</artifactId>
</dependency>
In this sample we will use KeyCloak server as OAuth2 authorization server. Download and install KeyCloak according to instructions.
When you first access http://localhost:8080/auth, you will create a new user as per the instructions. After logging in, first, create a new realm with name testRealm

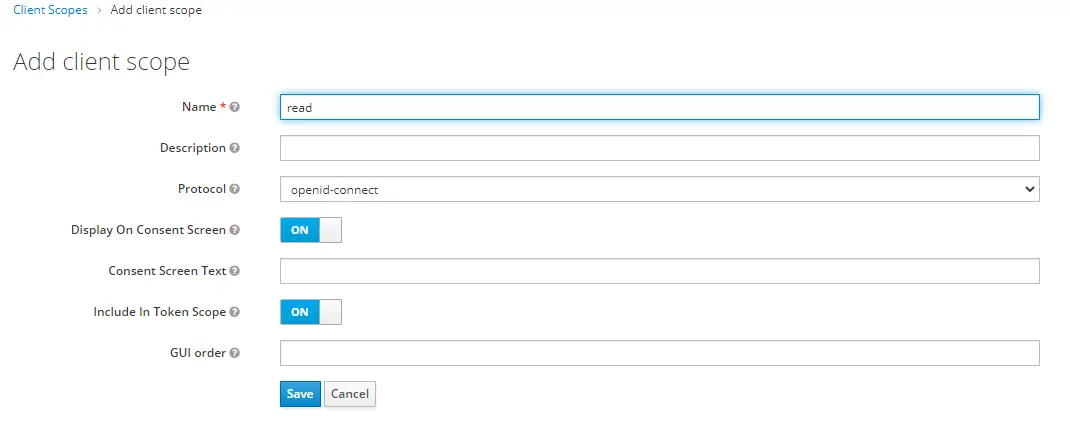
Add a new Client Scope name read
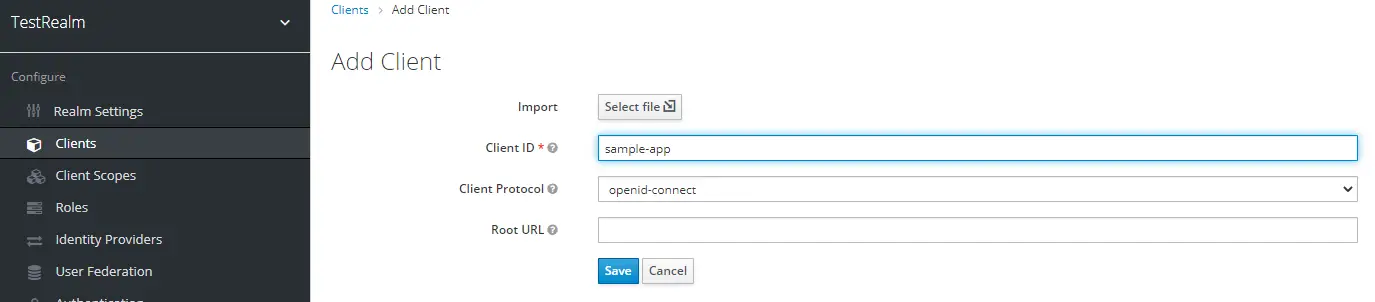
Then add a new client named sample-app
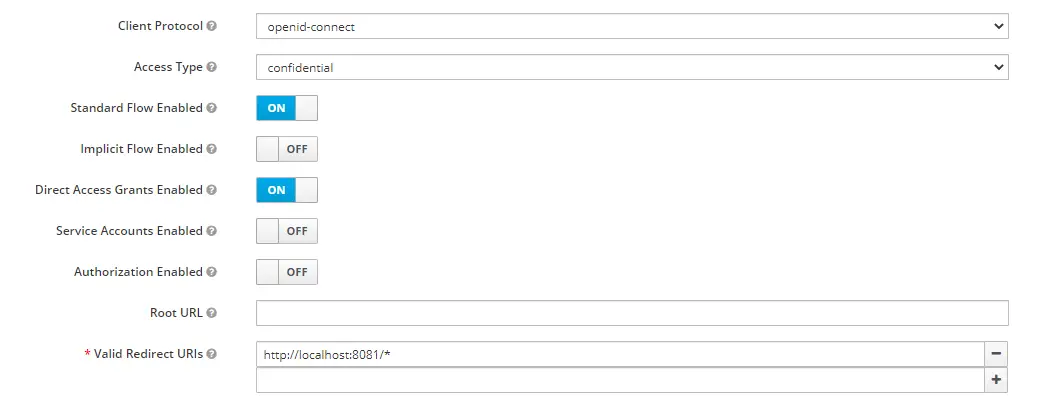
After pressing the Save button, you will be prompted with additional details. Add http://localhost:8081/* as Valid Redirect URIs and select Access Type as Confidential
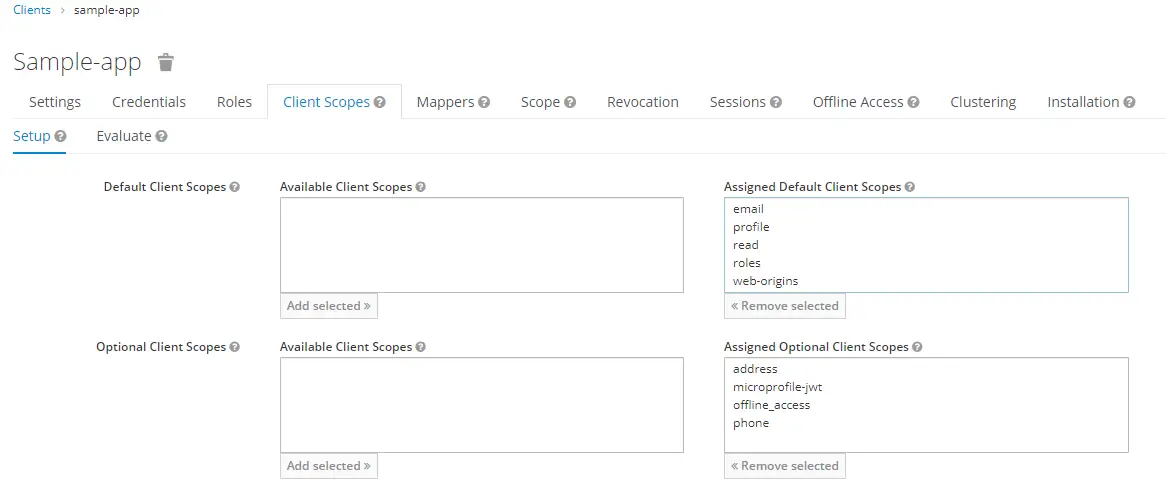
Then, navigate to the Client Scopes and add read scope to the Assigned Default Client Scopes
Now, add a user from the Users link on the left panel
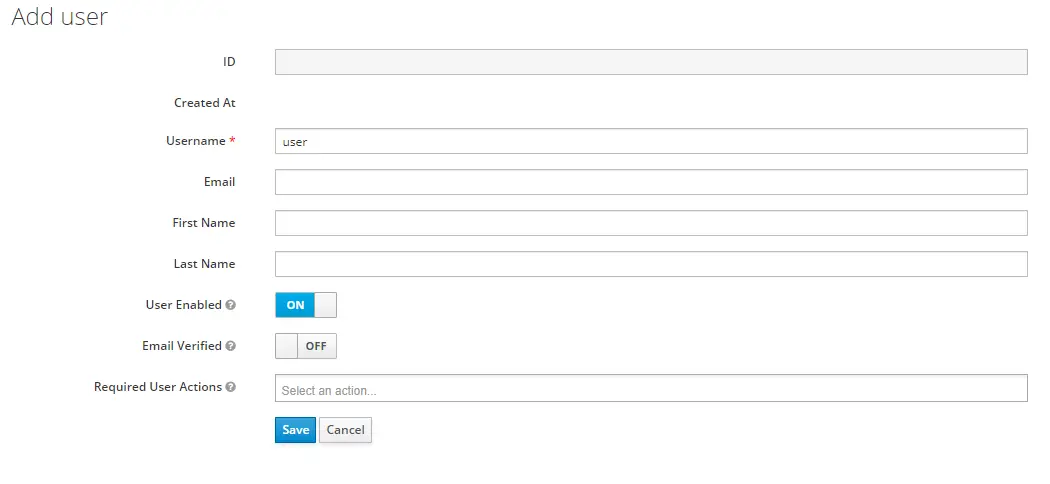
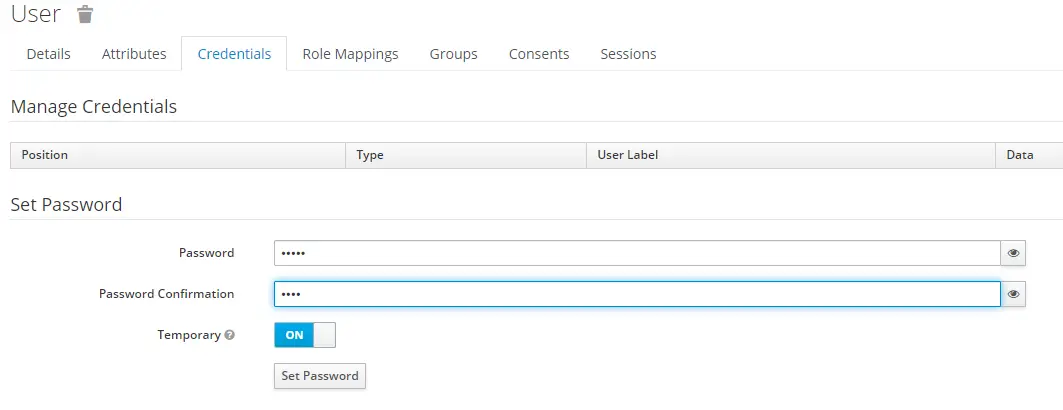
After saving the user navigate to the Credentials tab and add pass as password
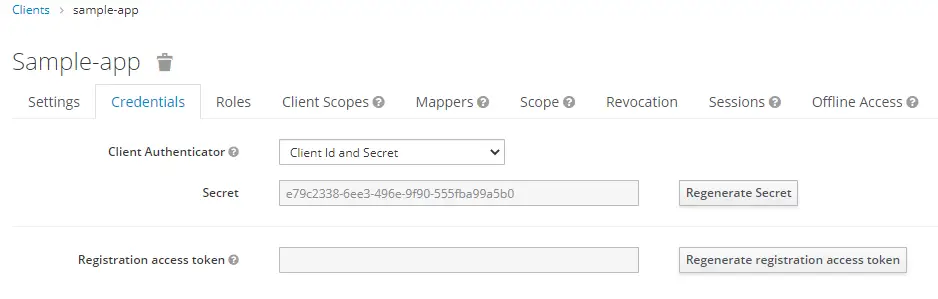
Finally, save the client secret from the Credentials tab in the sample-app details page
Now our Authorization Server setup is complete.
Spring Security supports protecting endpoints using two forms of OAuth 2.0 which are JWT and Opaque Tokens. Since we will be using Spring Boot, now we can add the minimum configuration using the application.yml as follows:
server:
  port: 8081

spring:
  security:
    oauth2:
      resourceserver:
        opaque:
          introspection-uri: http://localhost:8080/auth/realms/testRealm/protocol/openid-connect/token/introspect
          introspection-client-id: sample-app
          introspection-client-secret: e79c2338-6ee3-496e-9f90-555fba99a5b0
As you will see from the above configuration, we are changing the Spring default port to 8081 as Keycloak server is using the 8080 port. In order to use opaque tokens, we are adding introspection-* settings for the authorization URI, client ID (which we created from the Keycloak admin console) and the client secret. The introspection endpoint can be retrieved from our testRealm configuration. You can see all configuration info from http://localhost:8080/auth/realms/testRealm/.well-known/openid-configuration
In order to use opaque tokens, add the following dependency to your pom.xml
<dependency>
    <groupId>com.nimbusds</groupId>
    <artifactId>oauth2-oidc-sdk</artifactId>
    <scope>runtime</scope>
</dependency>
We will now add a simple rest controller that will be secured by OAuth2. Just create a sample class with RestController annotation, then add one GET and one POST request sample.
@RestController
public class SpringOauth2DemoRestController {

    @GetMapping("/hello")
    public String message(@AuthenticationPrincipal(expression="subject") String subject) {
        return "Hello " + subject;
    }

    @PostMapping("/hello")
    public String createMessage(@RequestBody String message) {
        return "You sent: " + message;
    }

}
We will now secure our application by enabling web security with Spring Security configuration. Implement the configure method by extending Spring’s WebSecurityConfigurerAdapter class and adding EnableWebSecurity annotation.
@EnableWebSecurity
public class SpringOauth2DemoSecurityConfiguration extends WebSecurityConfigurerAdapter {

    @Value("${spring.security.oauth2.resourceserver.opaque.introspection-uri}") String introspectionUri;
    @Value("${spring.security.oauth2.resourceserver.opaque.introspection-client-id}") String clientId;
    @Value("${spring.security.oauth2.resourceserver.opaque.introspection-client-secret}") String clientSecret;

    @Override
    protected void configure(HttpSecurity http) throws Exception {
        // @formatter:off
        http
                .authorizeRequests((authorizeRequests) ->
                        authorizeRequests
                                .antMatchers(HttpMethod.GET, "/hello/**").hasAuthority("SCOPE_read")
                                .antMatchers(HttpMethod.POST, "/hello/**").hasAuthority("SCOPE_write")
                                .anyRequest().authenticated()
                )
                .oauth2ResourceServer((oauth2ResourceServer) ->
                        oauth2ResourceServer
                                .opaqueToken((opaqueToken) ->
                                        opaqueToken
                                                .introspectionUri(this.introspectionUri)
                                                .introspectionClientCredentials(this.clientId, this.clientSecret)
                                )
                );
    }
}
In the above sample, we are securing the GET request by checking read scope and POST request by checking the write scope using OAuth2 authorization token. We are also configuring the introspection URI as KeyCloak server using our previously created client-id and client-secret.
Now start our sample application by executing spring-boot:run Maven goal. If you access http://localhost:8081/hello rest service you will get HTTP Error 401 which leads to Unauthorized access.
We will now get an access token from the Keycloak server. Our application will use this access token to request data from our resource server (the REST service that we have created). To obtain the access token in one step, we will use the password grant type and post the credentials to the token endpoint of the authorization server. We will be using Postman for visualization but, you can write a unit test or use Curl to post the same data.
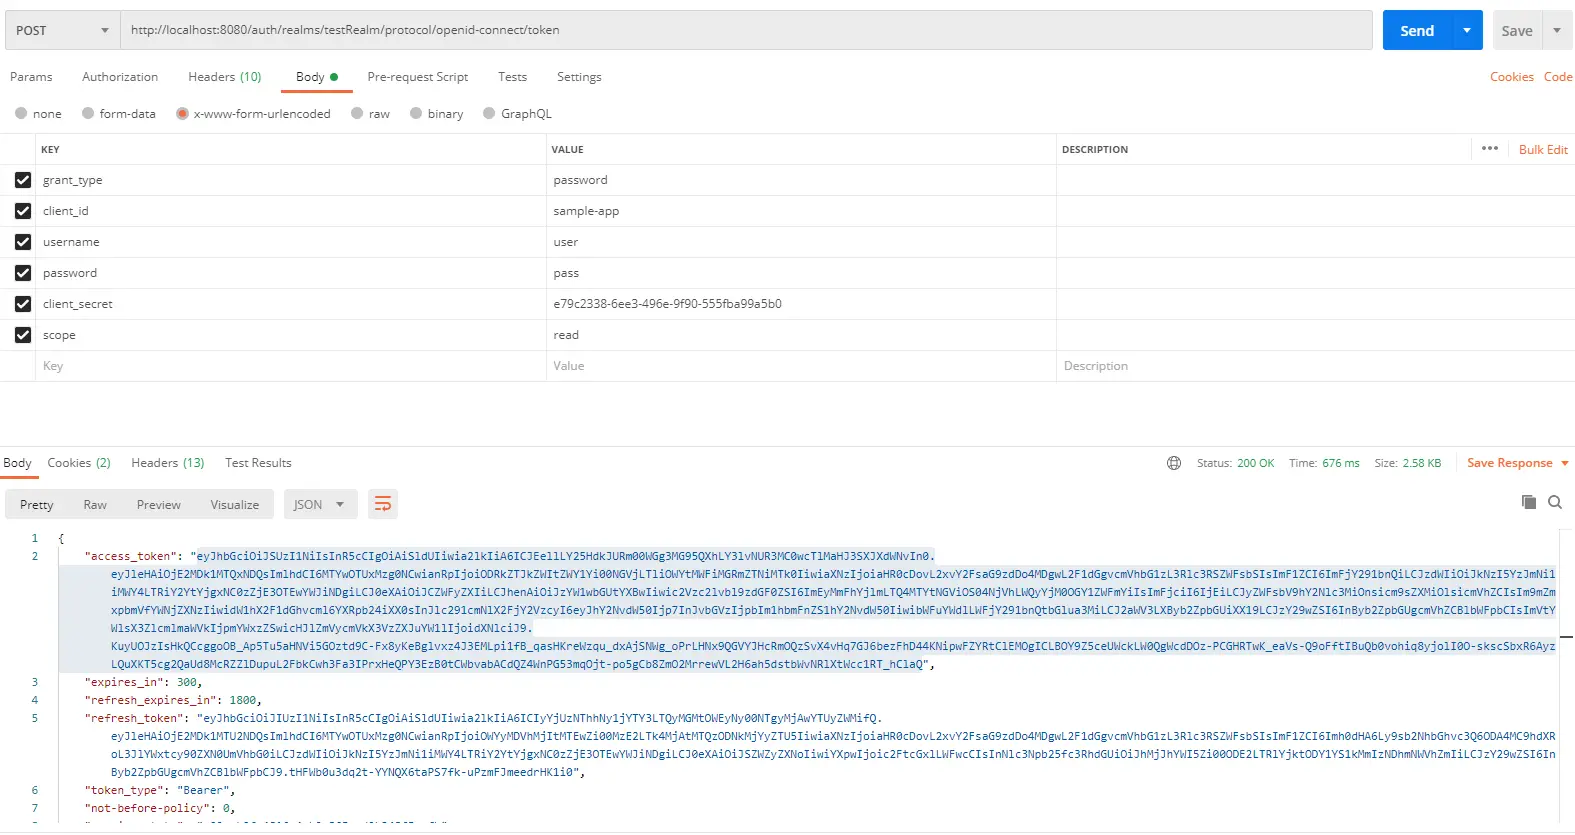
We are sending the following parameters to the token endpoint:
- grant_type: Password grant type is used
- client_id: The client name that we created from the Keycloak admin console
- client_secret: The generated client secret that we have taken
- username: The name of the user we created from the Keycloak admin console
- password: Password of the user
- scope: The scope that we request for this user
When we post the message to Token Endpoint we will get access_token and refresh_token from the authorization server. We can now use this access_token to access the REST service.
The token can be sent along with the Authorization token. Now we will add this header with the value Bearer [TOKEN_VALUE]
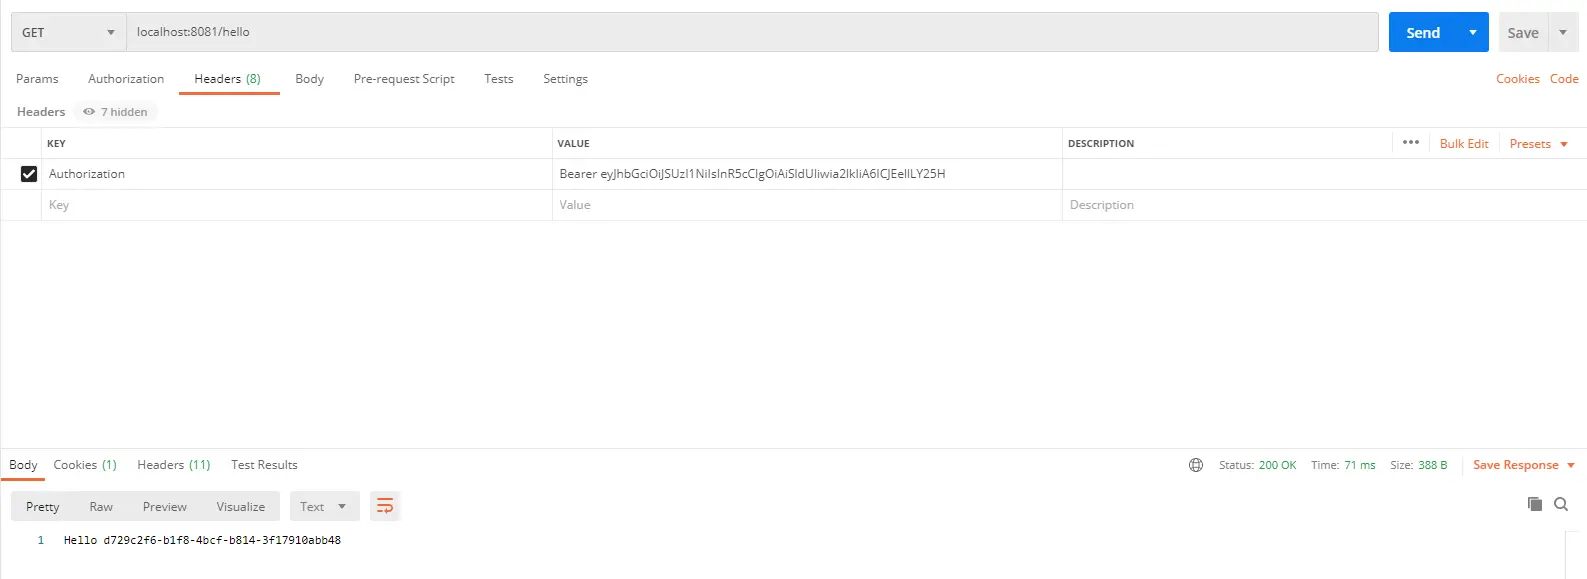
When we make a GET request with the authorization header, we will see that the service will return with Hello [USER_ID] message. However, when you try a POST request to the same URI, you will get 401 Unauthorized error. Because, for that request, we are checking for the write scope. You will see the following output if you add this new scope to our sample-app client.

Summary
In this article, we first looked at the details of the OAuth2 authorization framework. Then we made configurations on our sample authorization server (KeyCloak) and built a sample working Spring Boot and Spring Security application secured with OAuth2 authorization.