1. Overview
Spring Framework
In the year 2000, Sun Microsystems announced the Java EE platform with several specifications. A plethora of popular standards in the Java world followed, many of which were productionalized very quickly. There were servlets and Java Server Pages (JSP) for building web-based platforms, Enterprise Java Beans (EJB) for data management, RMI and Corba for remote access to business services, and the popular Java Message Service (JMS) for asynchronous messaging.
In 2003, we started to hear about a framework called Spring, enabling us to implement the same features of Java EE with easy programming concepts and a different alternative to EJBs.
The Spring Framework is a comprehensive, Java-based platform that provides several infrastructures and client/server libraries for rapid application development.
Spring Philosophy
The Spring Framework introduced two important design patterns for Java-based applications.
- Plain Old Java Objects (POJO)
- Inversion of Control (IoC) and Dependency Injection (DI)
The biggest popularity of Spring has come from a simplification of the Java EE platform services. By only using POJOs, we have the full capability to apply enterprise service concepts for simple applications. For example, we can have a local Java method that can be a part of a database transaction where we don’t deal with any transaction API. Likewise, we can define simple local Java methods as HTTP endpoints without dealing with Servlet APIs. Of course, the same mechanisms also apply with EJBs, JMS, JMX, web services, etc.
The other important feature of the Spring Framework is the management of dependencies and reference/easy implementations for design patterns which makes your application modules more manageable. Though the Java platform provides a rich programming language, developers have to routinely implement some standard design patterns and manage the dependencies of modules required by the application. The Spring IoC addresses this problem with patterns that can be integrated, scaled, and managed easily. In addition, IoC leverages several other patterns like service locator, factory, strategy design, and dependency injection.
Dependency Injection is an important pattern to implement IoC where objects’ dependencies are injected by configuration. IoC enables interface-based programming, decoupling the implementation, easily switching between different implementations, modularity, easy testing, etc.
Today, Spring Framework is the defacto standard for starting a new Java application. Most of the enterprises that use Java have adopted Spring Framework.
Spring Boot
The Spring Boot project was started in 2013 to make it easy to stand up production-grade Spring applications.
In a given enterprise environment, every time we create a new application, we have to repeat the same set of configurations repeatedly. So spring Boot project was built for quick and easy Spring framework based application development with little or no configuration.
Spring Boot Philosophy
We can trace the original request for building Spring Boot to this Github issue – improving containerless web application architectures. The primary goals of the spring boot project are:
- Make it super easy to start new application development with Spring
- Working out-of-the-box with little or no configuration. Easy configuration when defaults are not sufficient
- Provide standard non-functional features common in most projects (like security, metrics, embedded containers, etc.)
- Provide value without generating code
2. Building a Simple Web Application
Overview
We will now set up two simple web applications – one using the Spring Framework and another one using Spring Boot. We will have an index page, have a link on the index page that will call our service, and a response page showing our service result.
For simplicity, we will use simple Java Server Pages (JSP) and Tomcat as the container.
Dependencies
Library Versions
The versions of the libraries that we used for the sample application are as follows:
-
Spring Framework: 5.3.2
- Spring Core: 5.3.2
- Spring Beans: 5.3.2
- Spring Context: 5.3.2
- Spring AOP: 5.3.2
- Spring Expression: 5.3.2
- Spring JCL: 5.3.2
- Spring Web: 5.3.2
- Spring Web MVC: 5.3.2
-
Spring Boot: 2.4.1
- spring-boot-starter-web: 2.4.1
- spring-boot-starter-logging: 2.4.1
- spring-boot-autoconfigure: 2.4.1
- spring-boot-starter-json: 2.4.1
- spring-boot-starter-tomcat: 2.4.1
- tomcat-embed-jasper: 9.0.41
- spring-boot-starter-test: 2.4.1
- spring-boot-starter-web: 2.4.1
Maven Dependencies
To set up the web application, we will use the Spring Web and Spring Web MVC libraries.
For standard Spring Application, add the following dependencies:
<dependency>
    <groupId>org.springframework</groupId>
    <artifactId>spring-webmvc</artifactId>
    <version>5.3.2</version>
</dependency>

<dependency>
    <groupId>org.springframework</groupId>
    <artifactId>spring-test</artifactId>
    <version>5.3.2</version>
</dependency>
Without Spring Boot, we don’t have the option of embedding a Tomcat container. There are some Maven plugins and IDE plugins for this purpose. In this article, we will use one of them.
If you check the pom.xml for the Spring Boot application, you will see the following:
<dependency>
    <groupId>org.springframework.boot</groupId>
    <artifactId>spring-boot-starter-web</artifactId>
</dependency>
<dependency>
    <groupId>org.apache.tomcat.embed</groupId>
    <artifactId>tomcat-embed-jasper</artifactId>
    <scope>provided</scope>
</dependency>
<dependency>
    <groupId>org.springframework.boot</groupId>
    <artifactId>spring-boot-starter-test</artifactId>
    <scope>test</scope>
</dependency>
We have similar dependencies for enabling Spring Web and Spring Test libraries. Besides this, we are adding tomcat-embed-jasper dependency to enable JSP support within embedded Tomcat.
Creating a Controller
To handle web requests, we will need a simple controller with a hello method annotated with RequestMapping. The controller code will be the same for both types of applications.
This capability is part of Spring MVC, and so, the Controller & RequestMapping code is the same whether we use plain Spring with Spring MVC or Spring Boot with Spring MVC
@Controller
public class HelloController {

    @RequestMapping(value = "/hello", method = RequestMethod.GET)
    public String hello(ModelMap modelMap){

        modelMap.addAttribute("custom_message",
                "This is my custom  message!");
        System.out.println("Returning from hello method");
        // return to hello.jsp
        return "hello";
    }

}
This controller will be the endpoint for /hello GET requests. The service will respond with a custom_message attribute and return to hello.jsp that we will create in the next section.
Creating Web Pages
Now create src/main/webapp folder to add a welcome page and a response page. These will be simple JSP pages.
Add an index.jsp with the following content:
<!DOCTYPE html>
<html lang="en">
<head>
    <meta charset="UTF-8">
    <title>Hello World</title>
</head>
<body>
    <a href="hello">Hello. Press Me!</a>
</body>
</html>
This page only includes a link that will call our /hello GET mapping from the HelloController endpoint that we created.
Now add a response page by adding hello.jsp. This JSP will show the response received from our controller:
<!DOCTYPE html>
<html lang="en">
<head>
    <meta charset="UTF-8">
    <title>Hello World</title>
</head>
<body>
    <h1>Response Message:</h1>
    <h2>${custom_message}</h2>
</body>
</html>
Spring Web MVC will automatically convert the returned attribute (custom_message) from the endpoint during page processing. The same sample pages are used in both types of applications.
Configuring our Web Application
Bean configuration and wiring is where things start to differ between developing with plain Spring versus Spring Boot.
For the standard Spring application, we have to explicitly define the web and servlet configurations. First, we need a web.xml for enabling the Spring DispatcherServlet. Add the following contents to the webapp/WEB-INF/web.xml.
<web-app xmlns="http://java.sun.com/xml/ns/javaee"
         xmlns:xsi="http://www.w3.org/2001/XMLSchema-instance"
         xsi:schemeLocation="
                    http://java.sun.com/xml/ns/javaee
                    http://java.sun.com/xml/ns/javaee/web-app_3_0.xsd">

    <display-name>Spring Web Application</display-name>

    <!-- Spring MVC Dispatcher Servlet -->
    <servlet>
        <servlet-name>dispatcher</servlet-name>
        <servlet-class>org.springframework.web.servlet.DispatcherServlet</servlet-class>
        <init-param>
            <param-name>contextConfigLocation</param-name>
            <param-value>/WEB-INF/Hello-servlet.xml</param-value>
        </init-param>
        <load-on-startup>1</load-on-startup>
    </servlet>

    <!-- URL mapping for Spring MVC Dispatcher Servlet -->
    <servlet-mapping>
        <servlet-name>dispatcher</servlet-name>
        <url-pattern>/</url-pattern>
    </servlet-mapping>

</web-app>
Now, we will add the context configuration file to configure our Spring Web application. Create an empty file in webapp/WEB-INF/Hello-servlet.xml which we configured above. Here is what the Hello-servlet.xml look like:
<beans xmlns="http://www.springframework.org/schema/beans" ...>

    <context:component-scan base-package="com.talentify"/>
    <mvc:annotation-driven/>

    <bean class="org.springframework.web.servlet.view.InternalResourceViewResolver">
        <property name="prefix" value="/"/>
        <property name="suffix" value=".jsp" />
    </bean>

</beans>
In this file, we enable the Spring’s annotation based configuration, and the Spring Web MVC’s View configuration.
Now let’s have a look at the Spring Boot based application. As you may know, in Spring Boot, we need a main application class annotated with SpringBootApplication annotation. In this sample, to use Spring’s DispatcherServlet we will use some initializer from Spring Boot.
Add a new class with the following contents:
@SpringBootApplication
public class SpringbootDemoApplication extends SpringBootServletInitializer {

    public static void main(String[] args) {
        SpringApplication.run(SpringbootDemoApplication.class, args);
    }

    @Override
    protected SpringApplicationBuilder configure(SpringApplicationBuilder application) {
        return application.sources(SpringbootDemoApplication.class);
    }
}
Spring Boot’s SpringBootServletInitializer class enables the auto-configuration of the Tomcat container. So, we don’t need to define the web.xml and Hello-servlet.xml that we had to define in the plain Spring example above.
In order to tweak the servlet defaults, we can use the following configuration in the application.properties file:
spring.mvc.view.suffix=.jsp
server.servlet.context-path=/sample
Running The Sample Applications
To run the Spring application, you should first download Tomcat. Then, you can either install a Tomcat plugin or build the web archive (WAR) file and deploy by yourself.
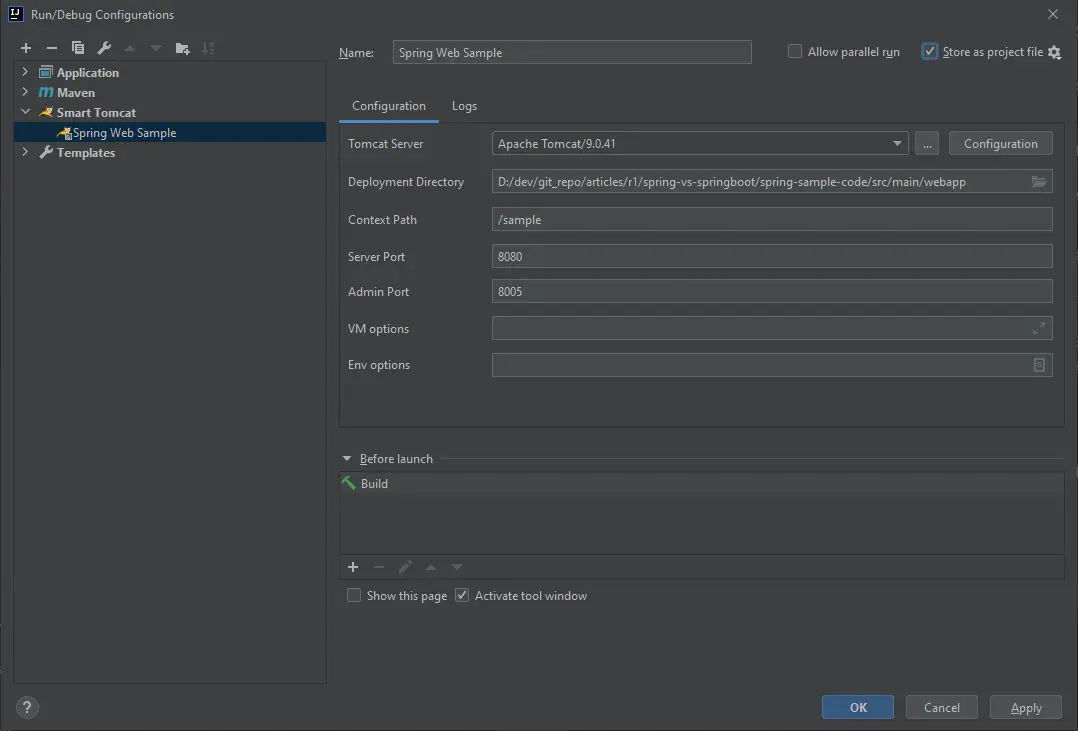
You can execute the war:war Maven goal and deploy the war file into the Tomcat yourself. If you are using IntelliJ IDEA IDE, you can install the Smart Tomcat plugin as shown below.

Then add a new Run Configuration and configure the Smart Tomcat plugin:
- Tomcat Server: Add your new downloaded Tomcat to the configuration
- Deployment Directory: Point to
src/main/webappfolder in your sample project - Context Path:
/sample - Server Port: The port that you want to run Tomcat server
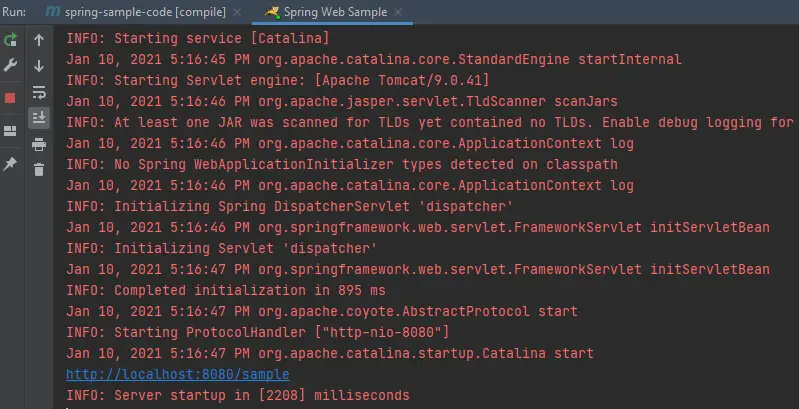
When you save and execute this configuration, maven will start the server, and deploy the application. Check the logs for the server startup:
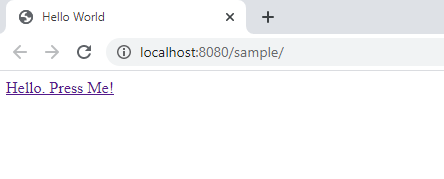
You can now open your favorite browser and navigate to http://localhost:8080/sample/. You will see the index page that we defined above.
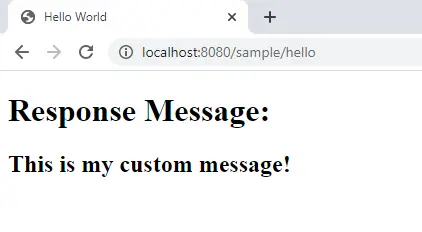
When you click the link that we defined in the index page, you will see the following output:
Running the Spring Boot application is easier as we don’t have to deal with the server setup and configuration. So, execute the following Maven goal with Spring Boot plugin to start our application.
mvn spring-boot:run
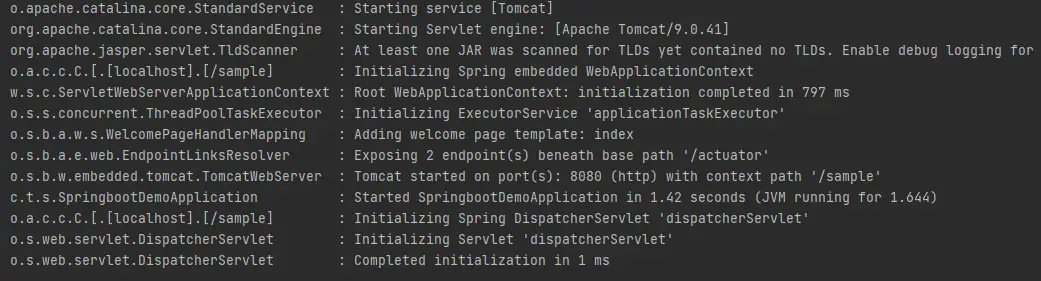
You will see the similar output that Spring Boot starts Tomcat, initializes DispatcherServlet and completes deployment of the application:
You can now navigate to http://localhost:8080/sample/ and the rest is the same as above.
3. Spring Boot Features
As you see in the above sample, Spring Boot provides some additional features on the Spring Framework. We will now summarize some of the important additional features.
Production Ready Feature Set
The Spring Boot has useful additions that we always need in production systems:
- Metrics
- Health Checks
- Containerization and Standalone Running
- Externalized Configuration
Spring Boot includes a number of features to monitor and manage the applications in production. The spring-boot-actuator module provides these features. You can add the following dependency to add actuator support:
<dependency>
    <groupId>org.springframework.boot</groupId>
    <artifactId>spring-boot-starter-actuator</artifactId>
</dependency>
There are many endpoints that you can enable or disable within your application. Each endpoint can be accessed over HTTP or JMX.
For example Spring Boot provides metrics endpoint that is used to show the metrics collected by your application. Spring Boot uses Micrometer and automatically configures its features. Spring boot has out-of-the-box integrations for several other monitoring systems as well
Spring Boot also provides interfaces to check the health of your application. For example, several auto-configured HealthIndicatorsshow the state of a database server, an Elasticsearch cluster, a JMS broker, a mail server, and much more.
One of the biggest features of the Spring Boot is running your application as a standalone component. In microservices architecture, each service runs in a separate process that can be deployed and scaled independently. Spring Boot web applications can run in a standalone mode without the need for any external servlet API provider (such as tomcat). They can be scaled easily by cloning the same application and running in different containers or servers.
At a certain time, there can be lots of instances of the same microservice. There can be cases where we need to update some configuration on these microservices. If the configuration is embedded within our Spring Boot application, we will have to redeploy each instance of our application. Spring Boot provides an externalized configuration support for this problem. We can store the configuration in an external store like environment variables, file system, database etc.
For example if you want to save your application.properties file outside your application JAR files, you can add it to the following directories which Spring Boot automatically scans:
-
The current directory from which your application’s process starts
-
The
/configsubdirectory in the current directory -
Immediate child directories of the
/configsubdirectory
Auto Configuration
Spring Boot enables us to automatically configure Spring and 3rd party libraries. Spring Boot does not generate any code and removes the requirement of XML based configurations. There are also starter dependencies which simplify our build configuration files. There is also Spring Initializr project where we can download an application template configured based on our requirements. All of these features removes the configuration of critical parts of a new project.
Starter Concept
In order to simplify dependency management, Spring Boot provides starter POMs and Gradle scripts that we can easily include in our build configurations. The starters manage all the dependencies of a Spring related technology where you don’t have to track and catch tens of dependencies. For example if you want to build a simple REST service running standalone in an embedded tomcat, all you have to do is adding the following starter in your dependency list:
<dependency>
    <groupId>org.springframework.boot</groupId>
    <artifactId>spring-boot-starter-web</artifactId>
</dependency>
Nearly in all Java based applications, we need to use Spring Test, JUnit, Hamcrest and Mockito. We can easily add this dependency by just using one dependency, and we don’t have to deal with versions. When we upgrade our Spring Boot application, the test libraries are also updated automatically.
<dependency>
    <groupId>org.springframework.boot</groupId>
    <artifactId>spring-boot-starter-test</artifactId>
    <scope>test</scope>
</dependency>
There are many starters for nearly all of Spring features like database access, batch processing, JMS, JPA, security, etc. Check the Spring Github for all starters list.
Embedded servlet container
Spring Boot enables us to use embedded Tomcat, Jetty, and Undertow containers directly. In this case, we don’t have to deal with their own configuration files, WAR files or deployment.
Maven plugin
Spring Boot contains a plugin in Apache Maven to support Spring Boot applications. This plugin enables us to package our Spring Boot applications as a standalone jar or war archives. It can generate specific build information and help on integration tests. You can add the plugin easily to your pom.xml as follows:
<build>
    <plugins>
        <plugin>
            <groupId>org.springframework.boot</groupId>
            <artifactId>spring-boot-maven-plugin</artifactId>
        </plugin>
    </plugins>
</build>
You can inherit default project properties for Spring Boot by inheriting a starter POM called spring-boot-starter-parent.
<parent>
  <groupId>org.springframework.boot</groupId>
  <artifactId>spring-boot-starter-parent</artifactId>
  <version>2.4.1</version>
</parent>
The plugin also offers us some Maven goals starting with spring-boot and let us customize the Spring Boot configuration from the command line.
Some of the important goals are:
| Goal | Description |
|---|---|
| spring-boot:run | Running the application |
| spring-boot:help | Display help about the plugin |
| spring-boot:repackage | Repackage existing JAR and WAR archives to make them standalone executables with nested dependencies |
6. Advantages of Spring Boot
Spring Boot increases the productivity of developers as it reduces the time required for development activities. It includes opinionated defaults for Spring and enable to setup Spring-based applications easily.
It simplifies building a production grade Spring application as it helps us to autoconfigure most of the components. It also provides a default setup for unit and integration tests. All these features helps us to avoid manual work of creating complex XMLs, annotations and, writing boilerplate code.
Spring Boot also brings a level of code standardization which enable to maintain multiple Spring based applications with a similar codebase.
The integration with the Spring ecosystem like Spring Data, Spring Security, Spring ORM/JPA, and Spring JDBC is straight-forward.
There are some plugins that we can use to work with embedded and in-memory databases easily. Database and queue connections can be easily setup. Some of the example integrations are like Oracle, MySQL, MongoDB, PostgreSQL, Redis, Solr, ElasticSearch, Kafka, Rabbit MQ, ActiveMQ, and many more.
7. Conclusion
As we have shown, the Spring Boot framework helps us reduce the development time while improving the quality & consistency of our Spring applications. Therefore, in most situations, when starting new application or microservice development with Spring framework, using Spring Boot will most likely be a better choice than not.